
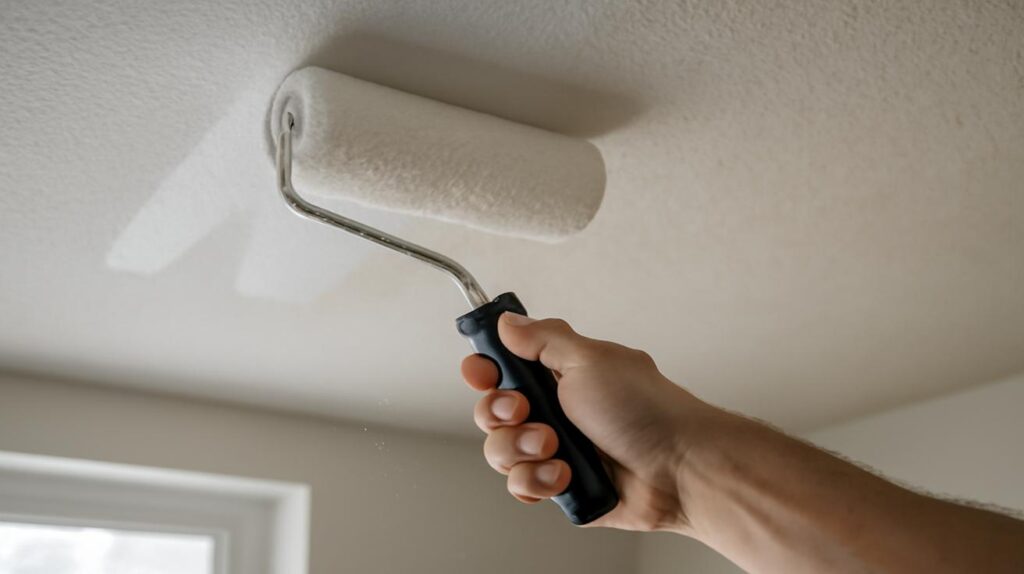
Garrett wiped the sweat from his forehead and stared up at his living room ceiling in disbelief. What should have been a simple weekend paint job had turned into a nightmare of streaks, patches, and uneven coverage. “I followed every YouTube tutorial,” he muttered to his wife, pointing at the roller marks that seemed to catch the light from every angle. “How is it possible that something so basic could look this terrible?”
Three coats later, Garrett’s ceiling still looked like a patchwork quilt of different white shades. The streaky mess was driving him crazy, and he was ready to call in professionals.
Little did Garrett know, he was missing one crucial technique that professional painters have used for decades—a simple roller move that eliminates streaks and delivers uniform coverage in a single pass.

The Game-Changing Technique You’ve Never Heard Of
The secret isn’t about buying expensive equipment or premium paint. It’s about mastering what professionals call the “W-pattern backroll technique.” This method completely changes how paint distributes across your ceiling, eliminating the streaky, patchy results that plague most DIY painters.
Here’s why most ceiling painting attempts fail: people roll in straight lines, creating overlapping wet and dry areas that show up as streaks when the paint dries. The roller picks up different amounts of paint with each stroke, and without proper blending, these variations become permanent.
Most homeowners think painting a ceiling is just about rolling back and forth in straight lines. That’s exactly what creates those horrible streaks that no amount of additional coats can fix.
— Marcus Rodriguez, Professional Painter with 15 years experience

The W-pattern technique works by creating a consistent base layer of paint that gets evenly distributed before any section begins to dry. This prevents the lap marks and streak patterns that occur when wet paint meets partially dried paint.
Step-by-Step Breakdown of the Streak-Free Method
The technique involves three distinct phases that must be completed while the paint remains wet. Timing is everything with this method.
Phase 1: Create the W Pattern

- Load your roller with paint, but don’t over-saturate it
- Starting in one corner, roll a large “W” shape across a 4×4 foot section
- Keep the roller moving—never stop mid-stroke
- The W should cover about 80% of your section area
Phase 2: Fill the Gaps
- Without reloading the roller, fill in the empty spaces within your W
- Use random, overlapping strokes
- Work quickly while the paint is still wet
- Don’t worry about perfection at this stage
Phase 3: The Critical Backroll
- Now make long, light strokes in one direction across the entire section
- Use minimal pressure—let the roller barely touch the surface
- This final step blends everything into uniform coverage
- Move immediately to the next section and repeat
| Traditional Method Problems | W-Pattern Solutions |
|---|---|
| Visible roller marks | Backroll step eliminates texture lines |
| Uneven paint thickness | W-pattern distributes paint evenly |
| Streaky lap marks | Wet-into-wet technique prevents streaks |
| Multiple coats needed | Single coat coverage when done correctly |
| Touch-ups required | Uniform finish needs no touch-ups |
The backroll step is what separates amateur work from professional results. It’s the difference between a ceiling that looks painted and one that looks perfect.
— Jennifer Chen, Interior Design Contractor

Why This Technique Delivers Professional Results
The science behind this method is surprisingly simple. Paint has a limited “open time”—the window when it remains workable before starting to dry. Traditional rolling methods waste this time by working in long strips that begin drying before you can blend them properly.
The W-pattern maximizes your open time by working in manageable sections. You’re essentially creating a paint “reservoir” that stays wet long enough for proper blending. The final backroll step smooths everything into a uniform finish before the paint begins to set.
Professional painters also know that roller selection matters tremendously for ceiling work. A 3/8-inch nap roller provides the perfect balance of paint capacity and smooth application for most ceiling textures.

I’ve seen homeowners struggle with ceiling painting for years, and it always comes down to technique, not tools. Once they learn the W-pattern, they’re amazed at how easy it becomes.
— David Thompson, Paint Store Manager
The pressure you apply during the backroll phase is critical. Too much pressure pushes paint around and creates new streaks. Too little pressure won’t blend the paint properly. The roller should glide across the surface with just enough contact to smooth the paint film.
Common Mistakes That Ruin Everything
Even with the right technique, several mistakes can sabotage your results. The most common error is working too slowly. If you take too long between the W-pattern and backroll steps, the paint begins to dry and creates permanent streaks.

Another frequent mistake is reloading the roller during the backroll phase. This adds fresh paint to areas you’ve already smoothed, creating uneven thickness. Only reload between sections, never during the blending process.
Room temperature and humidity also affect your success. Paint dries faster in hot, dry conditions, shortening your working time. On humid days, paint stays workable longer but may take longer to cure properly.
Temperature control is huge for ceiling painting. I always recommend working during moderate weather and using fans to maintain air circulation without creating drafts that dry the paint too quickly.
— Sarah Mitchell, Professional Painting Contractor

Lighting plays a crucial role in spotting problems before they become permanent. Work with strong, angled lighting that reveals any streaks or missed spots while you can still fix them. Natural daylight works best, but adjustable work lights can substitute when needed.
FAQs
How large should each W-pattern section be?
Keep sections to about 4×4 feet maximum. Larger sections dry before you can complete the backroll step properly.
Can this technique work with any type of ceiling paint?
Yes, but flat or matte finishes are most forgiving. Semi-gloss paints show imperfections more easily and require extra precision.

What if I notice streaks after the paint dries?
Unfortunately, dried streaks can’t be fixed with touch-ups. You’ll need to repaint the entire ceiling using the proper technique.
Do I need special rollers for this method?
A quality 9-inch roller with 3/8-inch nap works best. Cheap rollers shed fibers and don’t hold paint evenly.
How long do I have to complete each section?
Most paints give you 5-10 minutes of working time, depending on temperature and humidity. Work efficiently but don’t rush.
Should I thin the paint for better flow?
Only if the manufacturer recommends it. Over-thinning reduces coverage and can cause dripping problems.


Leave a Comment