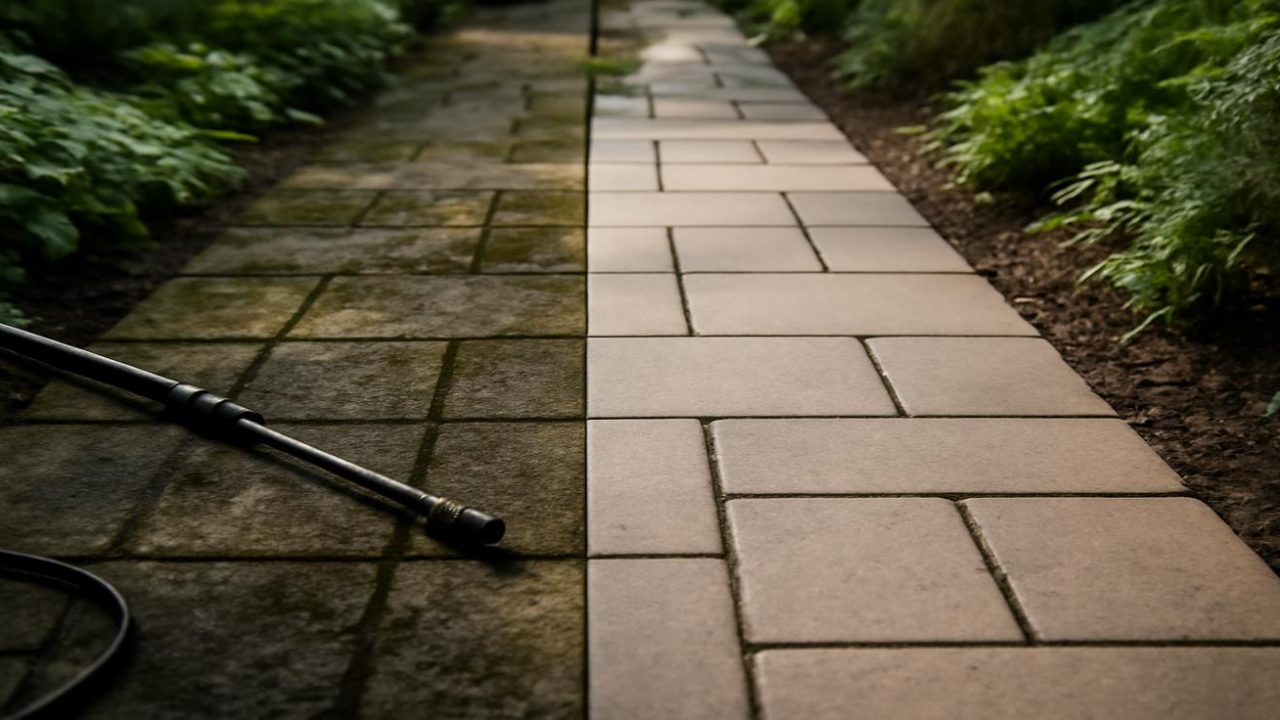
That patio you loved last summer—where you sipped iced coffee barefoot and gathered friends around mismatched chairs—has transformed into something unrecognizable. Dark patches streak across once-bright stones, green-black film coats the surface, and moss claims every crack between pavers.
The garden paths tell the same tired story. Algae smears across old paving stones while a kind of weary soot clings to everything, recording months of smoky evenings, wet leaves, and neglect.
Your first instinct might be to rent a pressure washer and blast everything back to naked stone. But there’s a gentler approach that requires almost no effort—one that lets chemistry, gravity, and time do the heavy lifting while you get on with your day.

Why Your Patio Turned Black (And Why Force Isn’t the Answer)
Outdoor surfaces record everything with brutal honesty. They capture the smoky evenings around fire pits, winters of wet leaves forgotten in corners, and years when overgrown hedges cast entire areas into greenish shade.
What’s actually coating your patio is a mix of living and non-living matter. The living components include algae, lichens, molds, and moss. The non-living grime consists of soot, leaf tannins, pollution, and soil particles that have bonded together over time.
Most homeowners reach for pressure washers, but water at high pressure can carve away soft mortar, gouge the texture of stone slabs, and drive moisture deep into hairline cracks where frost will later cause damage. The effort alone—wrestling cables, hoses, and roaring motors—leaves you with an aching back and potentially damaged surfaces.

The alternative approach treats cleaning like marinating tough meat. Instead of stabbing it with tiny knives, you let enzymes and salt work slowly, coaxing fibers apart over time. Similarly, you can lay down solutions that seep into biofilm and grime, breaking bonds so that rain and light scrubbing later send the mess drifting away.
The Gentle Chemistry That Actually Works
Several simple ingredients excel at breaking down the film coating your outdoor surfaces without requiring industrial equipment or harsh chemicals that send you scrambling indoors.
| Cleaning Agent | How It Works | Best For |
|---|---|---|
| Warm Water | Encourages natural breakdown, dissolves dirt and oily residues | Initial treatment for all surfaces |
| Mild Detergent | Loosens greasy films and trapped dirt without stripping stone | General grime and organic buildup |
| White Vinegar | Slightly acidic, breaks down soap scum and mineral deposits | Algae and slimy residues (not for all stones) |
| Oxygen-based Cleaners | Release active oxygen that breaks down organic matter | Stubborn biofilm and organic stains |
Warm water alone starts a helpful shift in breaking down accumulated grime. Even pouring buckets of hot (not boiling) water over grimy surfaces begins the gentle dissolution process that makes everything else more effective.

Plain washing-up liquid transforms water into something that can loosen greasy films without damaging the stone’s natural character. A small squirt in a bucket creates a solution that works quietly over time.
White vinegar proves surprisingly effective where algae has left surfaces slippery and film-covered. However, it’s not suitable for every type of stone, particularly those sensitive to acid.
Oxygen-based cleaners containing sodium percarbonate are the unsung heroes of outdoor cleaning. They release active oxygen that breaks down organic matter naturally, working even in cool weather without the environmental concerns of chlorine bleaches.

The Low-Effort Application Method
The beauty of this approach lies in letting time and gravity do most of the work. Rather than scrubbing immediately, you apply your chosen solution and allow it to penetrate the grime layers.
Start by clearing loose debris from the surface. Sweep away leaves, dirt, and any furniture that might interfere with treatment.
Apply your cleaning solution generously, ensuring complete coverage of stained areas. The goal is saturation, not surface wetting. Allow the solution to sit and work—this is where patience pays dividends.

For heavily stained areas, reapplication after the first treatment has dried can provide additional penetrating power. The cleaning agents continue working even as moisture evaporates, breaking down bonds in the grime matrix.
Weather becomes your ally in this process. Rain helps rinse away loosened debris, while natural temperature fluctuations help solutions penetrate deeper into stained areas.
What Happens During the Waiting Period
While you go about your day, chemistry works steadily on your behalf. The cleaning agents seep into biofilm layers, disrupting the bonds that hold algae, moss, and grime to stone surfaces.

Living components like algae and moss begin to lose their grip as their cellular structures break down. Non-living grime softens as solutions dissolve the sticky compounds that cement particles to surfaces.
This process can take hours or even days, depending on how thick the buildup has become. Heavily stained areas that developed over months or years won’t surrender overnight, but they will surrender with patience.
The key difference from pressure washing is that you’re not forcing anything. Instead, you’re convincing contaminants to let go naturally, which means less damage to surfaces and less physical effort for you.

The Final Reveal
After allowing adequate time for the solutions to work, a gentle rinse with a garden hose often removes most of the loosened grime. Areas that seemed permanently stained begin showing their original color.
For stubborn spots, a soft brush or broom provides enough mechanical action to dislodge remaining debris. The scrubbing required is minimal compared to traditional methods because the cleaning agents have already done the heavy lifting.
Multiple treatments may be necessary for severely neglected surfaces, but each application becomes more effective as layers of buildup are gradually removed.

The result is clean stone that retains its natural texture and character, without the gouging or damage that aggressive cleaning methods can cause.
Frequently Asked Questions
How long should I let the cleaning solution sit before rinsing?
Allow at least several hours for the solution to penetrate, though heavily stained areas may benefit from overnight treatment or longer.
Can I use white vinegar on any type of stone?
White vinegar should be avoided on acid-sensitive stones like marble or limestone, as it can cause etching and permanent damage.
Will this method work on severely blackened surfaces?
Yes, though heavily stained areas may require multiple treatments spaced over several weeks for complete restoration.
Is it safe to use oxygen-based cleaners around plants?
Oxygen-based cleaners are generally safer for surrounding vegetation than chlorine bleaches, but rinse nearby plants with water after application.
How often should I treat my patio to prevent future staining?
Annual treatment in spring typically prevents heavy buildup, though shaded or moisture-prone areas may benefit from twice-yearly applications.
What if some areas don’t respond to gentle cleaning methods?
Persistent stains may require targeted spot treatment with stronger solutions or professional assessment to determine if the discoloration is permanent.


Leave a Comment